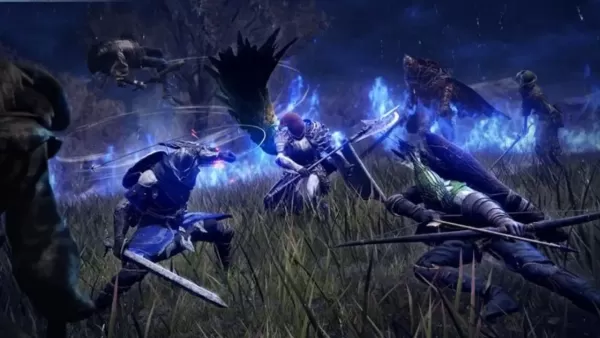
Elden Ring Nightreign has arrived—ushering in an era of shadow, storm, and relentless ambition. The skies of Limveld weep with eternal rain, and only the boldest Nightfarers dare rise against the looming threat of the Nightlord. To help you survive this dark odyssey, we’ve partnered with Maxroll to deliver a comprehensive suite of guides covering every facet of Nightreign—from getting started to mastering each unique Nightfarer and conquering the ever-shifting dangers of Limveld.
Getting Started in Nightreign
Before you step into the storm, Maxroll’s beginner's guide arms you with everything you need to know. Discover the eight playable Nightfarers, explore the central hub of Roundtable Hold, learn how to navigate the treacherous lands of Limveld, master the fundamentals of combat, and prepare for deadly encounters with the Nightlords. The guide wraps up with a deep dive into Nightreign’s metaprogression systems, setting the foundation for long-term progression across multiple runs.
For even more tips to kickstart your journey, check out IGN’s Essential Nightreign Tips and Tricks and Things Elden Ring Nightreign Doesn't Tell You!
Maxroll Nightreign Character Guides
Each Nightfarer brings a distinct playstyle and set of strengths to the battlefield. Learn what makes them unique and how to maximize their potential.
Wylder
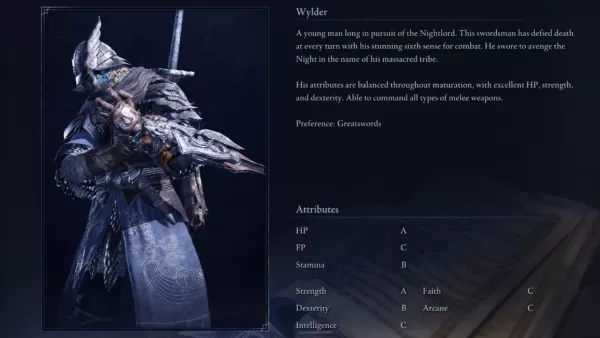
A balanced and beginner-friendly choice, Wylder thrives as a versatile generalist. His Sixth Sense passive grants immunity to one fatal blow per life, giving you a crucial second chance in tight situations. While he doesn’t specialize in any single weapon type, he handles most martial arms with ease. His natural affinity lies with the Greatsword, making it a solid go-to for consistent damage.
Wylder Character Guide
Guardian
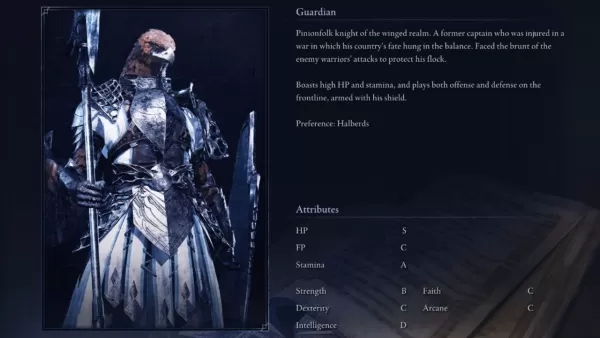
Built like a fortress, the Guardian is Nightreign’s premier tank. Equipped with a large shield and a weapon suited for guard-attacks—like a Halberd, Rapier, or Hand Crossbow—he excels at controlling space and disrupting enemy aggression. Though his damage output is modest, his high durability and defensive tools make him ideal for holding the front line.
Guardian Character Guide
Ironeye
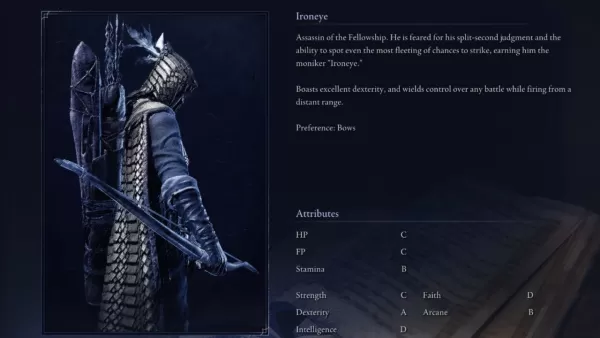
A master of the bow, Ironeye dominates from a distance. His high Dexterity also makes him effective with daggers and curved swords in close quarters. However, his low health and defenses mean melee combat is risky—use hit-and-run tactics and keep your distance. With simple mechanics and strong ranged capabilities, he’s perfect for newcomers.
Ironeye Character Guide
Duchess
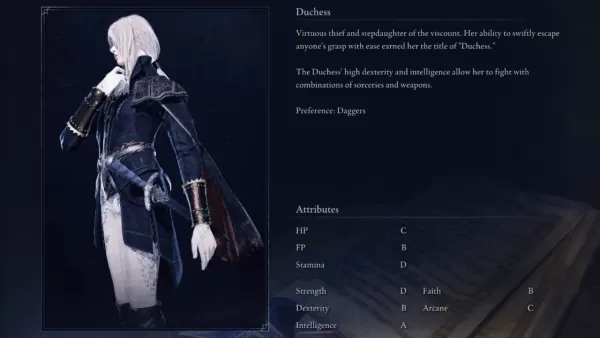
Graceful and deadly, the Duchess dances through battle with her dagger, using evasive maneuvers to strike and retreat. Her starting weapon features a powerful skill that imbues her blade with Magic affinity, boosting spell-based damage. With high Intelligence, she wields Glintstone Sorceries effectively, and her Faith scaling allows access to potent Incantations. Prioritize weapons with Magic or Frost Affinity to trigger effects like Frostbite and Blood Loss.
Duchess Character Guide
Raider

Power incarnate, the Raider smashes through enemies with colossal and heavy weapons. High Strength fuels devastating attacks, and his natural resilience makes him hard to stagger—ensuring his blows land. However, his extremely low FP pool limits his ability to use weapon skills frequently, so rely on raw power and timing.
Raider Character Guide
Revenant
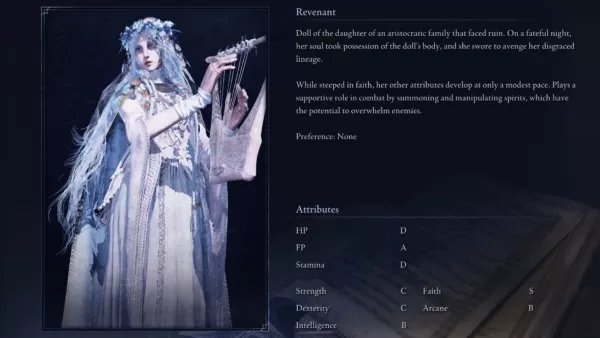
A support-focused Nightfarer, the Revenant channels her high Faith into offensive Incantations. Though she lacks FP regeneration, her passive ability summons spectral shades of defeated foes to fight alongside her, providing both distraction and supplemental damage. She’s best used in tandem with other damage dealers or in runs where sustained spellcasting isn’t the focus.
Revenant Character Guide
Recluse
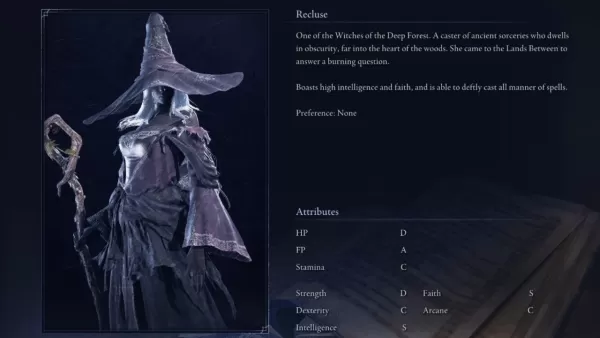
A full-fledged spellcaster, the Recluse excels at long-range devastation. Her character skill allows FP restoration, enabling sustained spellcasting. With stats geared toward Sorceries and Incantations, she can wield Magic, Frost, Fire, Holy, and Lightning-affinity weapons. While fragile and demanding precise resource management, her damage potential is unmatched when played skillfully.
Recluse Character Guide
Executor
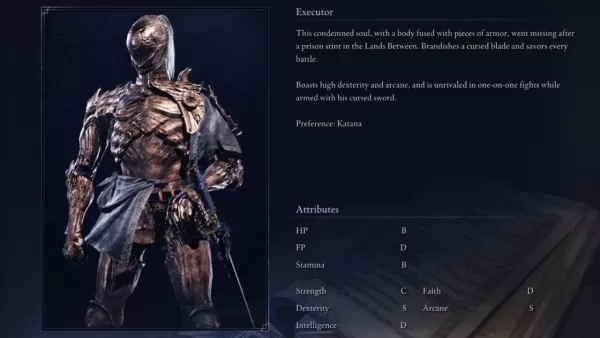
A precision duelist, the Executor dominates one-on-one duels with high Dexterity and Arcane stats. He shines with fast, agile weapons—especially Katanas, which scale well and inflict Blood Loss. Positioning is key, as his low durability makes him vulnerable to crowd pressure. Play smart, stay mobile, and dismantle your foes one by one.
Executor Character Guide
Nightreign Map Guides

Limveld is a land brimming with secrets, enemies, and rewards. Maxroll’s Limveld Map & Key Locations guide helps you navigate the region with confidence, detailing enemy types, encounter zones, and valuable loot drops.
Keep an eye out for Raid Events—random, high-intensity battles against powerful foes. Clear them to earn a powerful temporary ability that lasts the rest of your run.
Defeating a Nightlord triggers a Shifting Earth event, transforming a section of the map into a boss-filled zone with unique mechanics. Survive and conquer to claim a special, run-enhancing power. Dive deeper with Maxroll’s dedicated guides on both Raid Events and Shifting Earth events.
Nightreign Resources
Roundtable Hold serves as your central hub between expeditions. Here, you can switch Nightfarers, perform Relic Rites to upgrade your loadout, test builds in the Sparring Ground, consult the Visual Codex for lore and mechanics, track your progress in the Journal, and begin your ascent from the Table of Lost Grace to challenge the Nightlords.
Relics and Vessels form the backbone of Nightreign’s metaprogression. After each run, earn Relics and Murk to spend at the Small Jar Bazaar. Some Relics come with random affixes, while others—earned through quests or boss victories—offer fixed, powerful stats. As you progress, unlock additional Vessels to equip different Relic combinations, tailoring your build to your playstyle.
Spells in Nightreign are grouped into Spell Schools, which determine which buffs apply to them. For example, Glintstone Sorceries won’t benefit from bonuses to Godslayer Incantations. This system isn’t clearly explained in-game, so be sure to consult Maxroll’s Sorcery and Incantation School Guide to optimize your spellcasting.
Maxroll's Nightreign Database
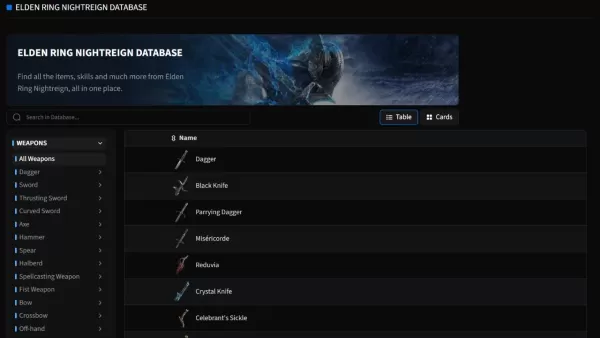
Explore the complete Elden Ring Nightreign Database by Maxroll—a meticulously detailed resource covering every aspect of the game. Browse in-depth entries on:
- Weapons: From Daggers and Swords to Bows, Staves, Seals, and off-hand gear.
- Skills: FP-consuming weapon arts that add tactical depth to combat.
- Sorceries & Incantations: Offensive, defensive, and utility spells across multiple schools.
- Relics & Vessels: Core components of metaprogression and build customization.
- Talismans: Found during runs, these grant small but impactful bonuses.
- Passive Traits & Weapon Passives: Temporary power boosts akin to boons in roguelikes, shaping your run’s trajectory.
Each entry includes expanded tooltip details, hidden mechanics, and lore insights—perfect for min-maxers and story hunters alike.
[ttpp]